Frame Your Images for Maximum Impact!
By Arthur H. Bleich–
Throughout history, great works of art have been showcased in frames and your best images deserve no less. It’s amazing how they’ll stand out and gain stature; a framed photograph seems to announce: “Look at me, I’m worthy of viewing!”
But how do you choose the right frame? For years I’ve put off framing my best images for two reasons. First, I wasn’t up to learning how to frame from scratch; for example, making my own frames which would involve sawing wood or metal, sizing paper mats, cutting glass or acrylic and buying all the tools required for it.

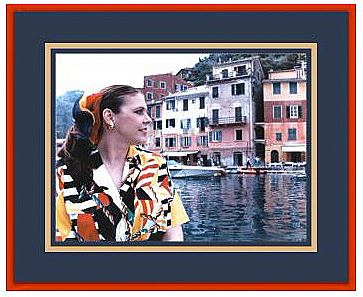
I’ve wanted to frame this image for years but just kept putting it off. Photo © Arthur H. Bleich
Even more daunting was that I just couldn’t visualize what frames were right for which images. Did I want a thick or thin frame? One of wood or metal? How wide should the mat be? Or should there be a mat at all? What about using colored mats or ones that had texture? See what I mean? It was all so over- whelming that I did nothing.
Of course, I could buy ready-made fames in pre-cut sizes but many of my images (and yours, I suspect) would have to be cropped in ways I wouldn’t want to. And the choice of frame materials and styles are limited; you’re also stuck with bland white mats that border the photos. They’re okay, maybe, for run-of-the-mill snapshots but hardly worthy of serious photography; in fact, they make some images look downright bad.

This wasn’t my cuppa tea nor was the high price of custom framing.
I had, at one time, dropped into a local frame store at a mall but there were just too many possibilities and not enough time to make a considered decision. And even with a hefty discount coupon, costs were high and some frame selections had to be ordered, which meant a wait of up to a month. But those hurdles aside, I still couldn’t see what the end result would look like with my image. So there I was, stuck in quicksand of indecision and afraid to make what could be a very pricey mistake, I passed.
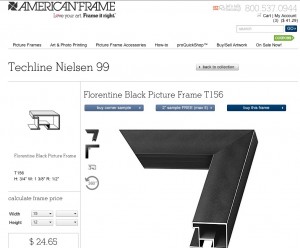
The first step is to pick a frame style and size.
Recently, though, things changed after I discovered a quick, easy and stress-free way to preview different framing and matting variations that would best show off my images– so I could avoid making expensive and time-consuming mistakes.
By using sophisticated software available at some picture framing sites you can select basic elements such as frame style, color and size and then upload the actual photo you want to frame so you can preview it as it will look hanging on the wall.
Here’s what you’ll see next at the American Frame site. It’s time to upload your image.
You can also choose various sizes and colors of mats to see how they’ll look and then, if you want to, change the frame size, style and color if what you first chose, falls out of favor. Wow! This was for me. No unpleasant surprises; everything could be locked down and pre-visualized in advance, and there was plenty of time to do it in without someone pressuring me to make a choice because they were anxious to make a sale. So I decided to give it a go and here’s what I came up with.
I started by selecting photo that I had shot of a friend in Portofino, Italy and sized it to 9 x 12 inches. Next, I chose a one-inch-wide, metal, black frame that measured 12 x 15 inches to allow a mat of about 2 inches wide as a border around the image.
Now we’re getting somewhere. The framing specs are shown under the image along with a tentative price list that includes all the frame elements. Time to experiment.
The frame could have been thicker or thinner or smaller or larger in dimension but I thought that would be a good starting point, besides which, as you’ll see, it could easily be changed so it wasn’t a lock-in.
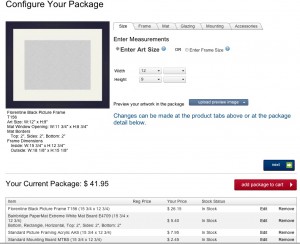
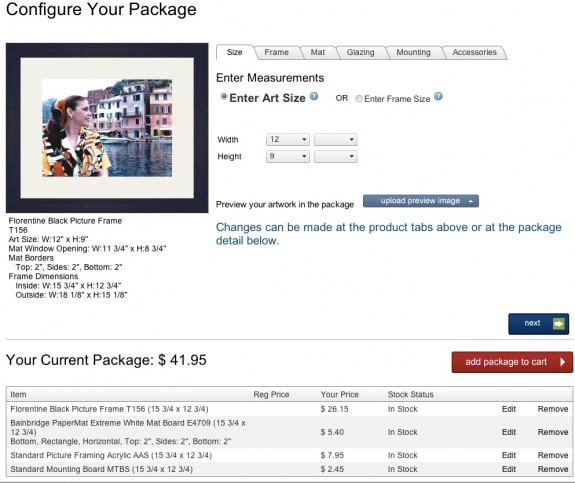
Next, I clicked on “Buy This Frame” which brought me to the “Configure Your Package” page where I uploaded my image which appeared in just a few seconds within my chosen frame. You can upload any JPEG or TIFF file on your computer with a file size of up to 100MB.
It’s like magic when you can try different mat colors and see how they’ll actually look with your image. No guessing, here. I changed both frame style and size from what I had first picked, but I still wasn’t satisfied– something was lacking.
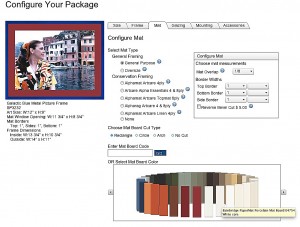
Now came the fun part where I experimented with different-colored mats and a thinner blue frame. Then, feeling adventurous, I scrapped everything and went with a red frame and three mats to give the image more depth. The mat colors I chose worked well with those in the picture and the frame color would add some pop to the room in which it was to be hung.
I’m not a color-and-design maven so a lot of this was just trial and error until it looked right to me. You might have picked a totally different combination which would have worked as well or even better; the point though, is that all of this was done at home with enough time to compare selections. And as I made changes, the costs were quickly recalculated so I always knew where I stood on that.
Because there are a lot variables that you can input, I found that these on-site preview programs sometimes slowed down a bit to catch their breath. And on rare occasions, when I selected a mat color, it didn’t display the one I picked. Clicking again on my choice usually jogged its memory. I’m probably nit-picking but that’s just my nature, having been a hardware and software reviewer for many years.
This was the end result. It elevates the original to a new level. With a triple mat (easy to do) the image gains depth and looks simply stunning.
After frame and mat selection, it was just a simple matter to follow through and make a choice of the type of acrylic glazing (or none if you’re going to use locally-cut glass), backing board (for the back of the frame) and check out some other interesting options. Then on to the end where you place your order, assured that all the pieces– frame, mat, acrylic facing and backing will fit perfectly when you put it all together.
What I would have liked to see on some of these preview programs is a feature that would allow me to save my mock-ups to a light box so I could view them side-by-side to make a final choice. But the work-around I used was to capture a simple screen-shot of each and view them all as a contact sheet in Photo Mechanic. You can easily do the same in any imaging program.
The frame I eventually designed cost about $60, including shipping. When I checked to see what the same frame would have cost at a local frame shop and at one of the Big Box stores that does custom framing, I was delighted to find that I had saved almost 50%.
Now all I have to do is print out those masterpieces that have been in my files for all these years, frame them, get them up on the wall, and enjoy them. Oh yes, and revel in the ooh-ahs from my friends.
RESOURCES
Frame Companies with Preview Software
Video Tutorials and Instructions
Original Publication Date: May 12, 2015
Article Last updated: May 12, 2015
Comments are closed.


Categories
About Photographers
Announcements
Back to Basics
Books and Videos
Cards and Calendars
Commentary
Contests
Displaying Images
Editing for Print
Events
Favorite Photo Locations
Featured Software
Free Stuff
Handy Hardware
How-To-Do-It
Imaging
Inks and Papers
Marketing Images
Monitors
Odds and Ends
Photo Gear and Services
Photo History
Photography
Printer Reviews
Printing
Printing Project Ideas
Red River Paper
Red River Paper Pro
RRP Newsletters
RRP Products
Scanners and Scanning
Success on Paper
Techniques
Techniques
Tips and Tricks
Webinars
Words from the Web
Workshops and Exhibits
all
Archives
March, 2024
February, 2024
January, 2024
December, 2023
November, 2023
October, 2023
September, 2023
August, 2023
May, 2023
more archive dates
archive article list


